
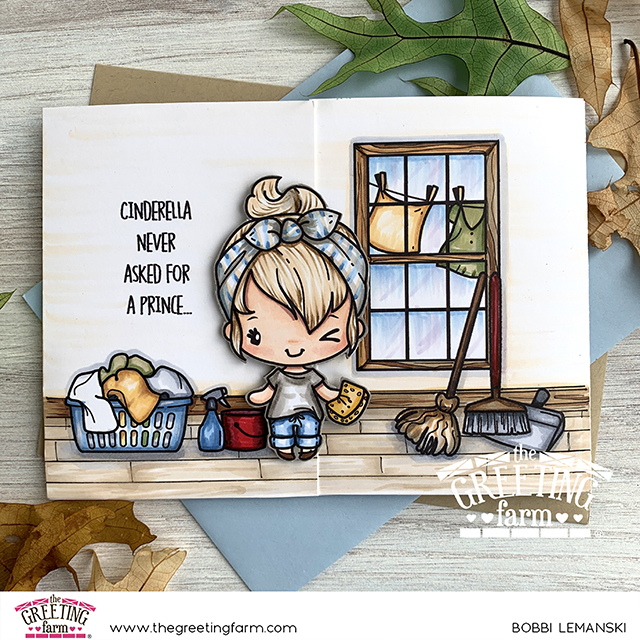
Hello Farm Friends! It’s Bobbi Lemanski here with a two-scene, gatefold card featuring The Greeting Farm stamp sets and Cinderella! I’m sharing this new project on The Greeting Farm blog today!
I’m using digi stamps for this project. I like using digis for cardmaking because you can size your characters and images to fit your card’s scenes. In this example, I needed my “Cindy” to be the same size on the front and inside the card since she is the same person. 🙂
Here’s a list of the products I’m using:
Chore Day digi set for front panel Cinderella, broom, mop, laundry, spray bottle, pail and outdoor wash line.
Porch 2 digi set for the window
Birthday Boys digi set for the balloon garland and streamers
Birthday Girls digi set for inside panel Cinderella, her dress and streamers.
I hand drew the wood floor and created the custom phrases with my laptop.

Card Base Cuts
For this 5″ X 7″ gatefold card, I cut out of 80lb Neenah Solar White cardstock:
- One card base measuring 11″ wide X 5″ tall. I scored 2″ in from each short side. The middle panel is now 7″ wide. The 2″ flaps will be used to adhere the “gate” sections.
- Two 3-1/2″ wide X 5″ tall interior panels for the gate panels. These panels will cover the bleed from the front panels and envelope the 2″ flaps.
Note: I use 80lb cardstock (v. 110lb) so that I can double layer the panels to cover the Copic marker bleeding. It keeps the weight down and makes for a nice sturdy card that’s not too heavy.

Card Front
On the outside, Cinderella is busy cleaning. She’s got wash on the line outside, a load to fold in the inside, a sponge in her hand and a mop and broom nearby. I used the Chores Anya for the front. When I saw this sweet girl, it reminded me of Cinderella which led to the card idea. To create the front, I simply arranged the digital stamps and added the phrase using Photoshop. You can recreate this using other software such as Microsoft Word, if you do not have Photoshop.
Note: TGF has excellent videos on how to work with digis to help you if digis are new to you.

Before printing the scene, I removed Anya and placed her on a separate sheet. Because this is a gatefold card, I didn’t want to slice her in half. Instead, I printed Anya on a separate sheet, backed her with black cardstock to cover the coloring bleed, and fussy cut her out. Once the card was assembled, I placed her over the gatefold opening and popped her up with foam tabs. It gives a nice clean finish when the card is opened. See photo above.
After the front was fully colored, I cut the scene in half at 3-1/2″ and attached to my card base’s 2″ flaps on each side. I used the pre-cut interior panels to envelope the 2″ flaps and cover any Copic marker bleed from the front panels.

Inside the Card
For the inside center panel, I assembled and printed my scene using images from the birthday digi sets (listed above) on 80lb cardstock. I cut it down to a 5″ X 6-5/8″ piece and colored it in with Copics. The scene was adhered to the inside, middle panel of the card base to complete the card.

Like Cinderella, let’s hope you’re day ends with a night off and a nice dress… or pajamas if you prefer! Skip the glass, I’ll take the fuzzy slippers and jammies. 🙂
Thanks for stopping by today. If you want to see more ideas and inspiration from me, subscribe to my blog, BobbiHartDesign.com. I’ll send you updates on new posts! You can also find me on Instagram as @BobbiHartDesign and on Facebook as BobbiHartDesign. Bobbi Hartmann Lemanski, Bobbi Hart♥ Design, Adding h♥art into every design


Fabulous design, your work is such a joy to see!
Love the Cinderella card!