
 Hello, Beautiful! It’s Day 2 of the Simon Says Stamp Blog Hop for the new Hello Beautiful spring release. I’m using four new products from this release and I can’t wait to share! But first some special offers for you…
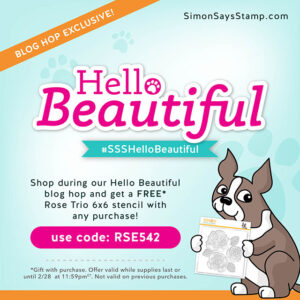
Shop during the blog hop and get a free rose trio 6″ X 6″ stencil with ANY purchase. USE CODE RSE542 to get yours FREE! This promotion will expire 2/28 at 11:59 pm EST. If you decide to place an order, please use the links in my post here so Simon Says Stamp knows who and what inspired you. It allows me to bring more ideas to you.
Leave a comment on my post below for a chance to win $25.00 to shop at Simon Says Stamp. It’s that easy to enter! Simon Says Stamp will choose the lucky winner from my post and announce it next Wednesday, 3/3/2021. Good luck. 🙂
Now for some ideas… Here’s the Simon Says Stamp products I’m using:
Bunny Blessings stamp set and here’s the stamp/die bundle: Bunny Blessings Bundle
Capital B Beautiful die set and here’s the coordinating stamp set if you are interested. While I’m not using it today, I did order one to use with my die set. 🙂
Mix and Match Circles Stencils
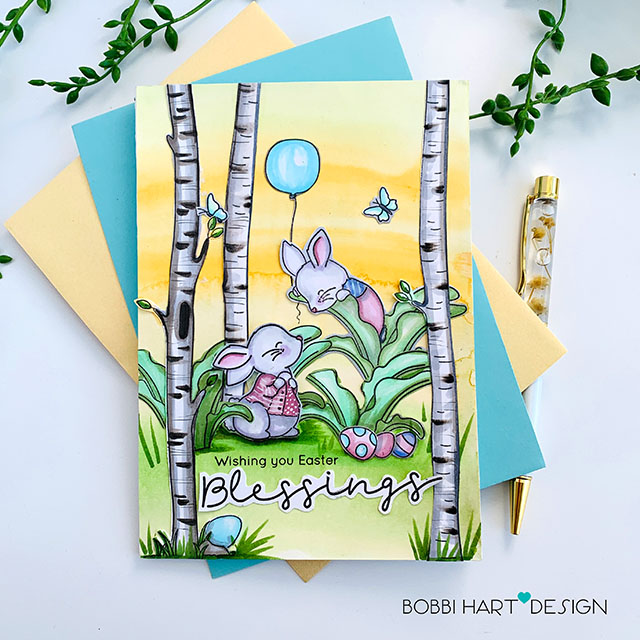
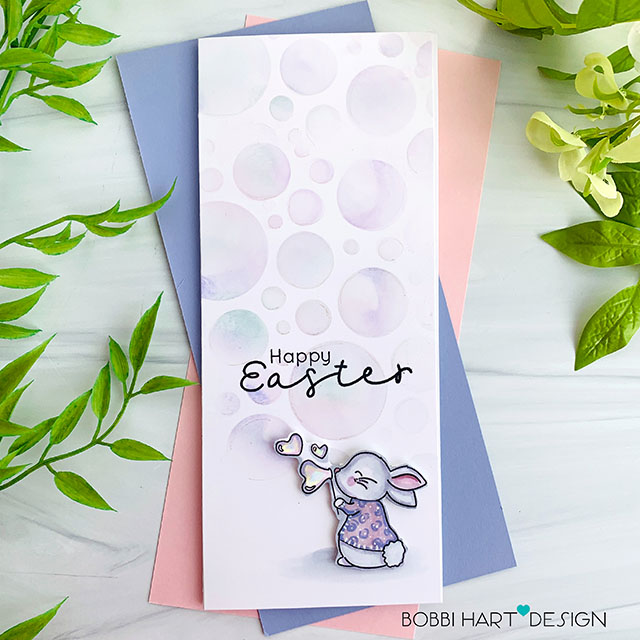
Beautiful Bunnies Slimline Card
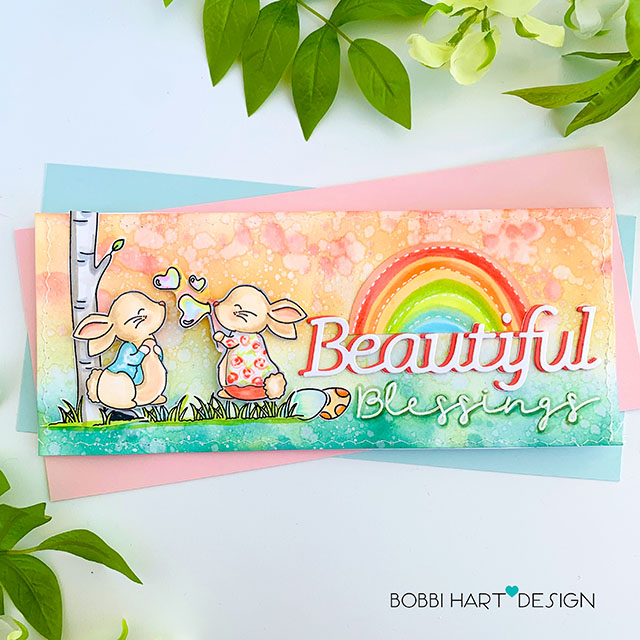
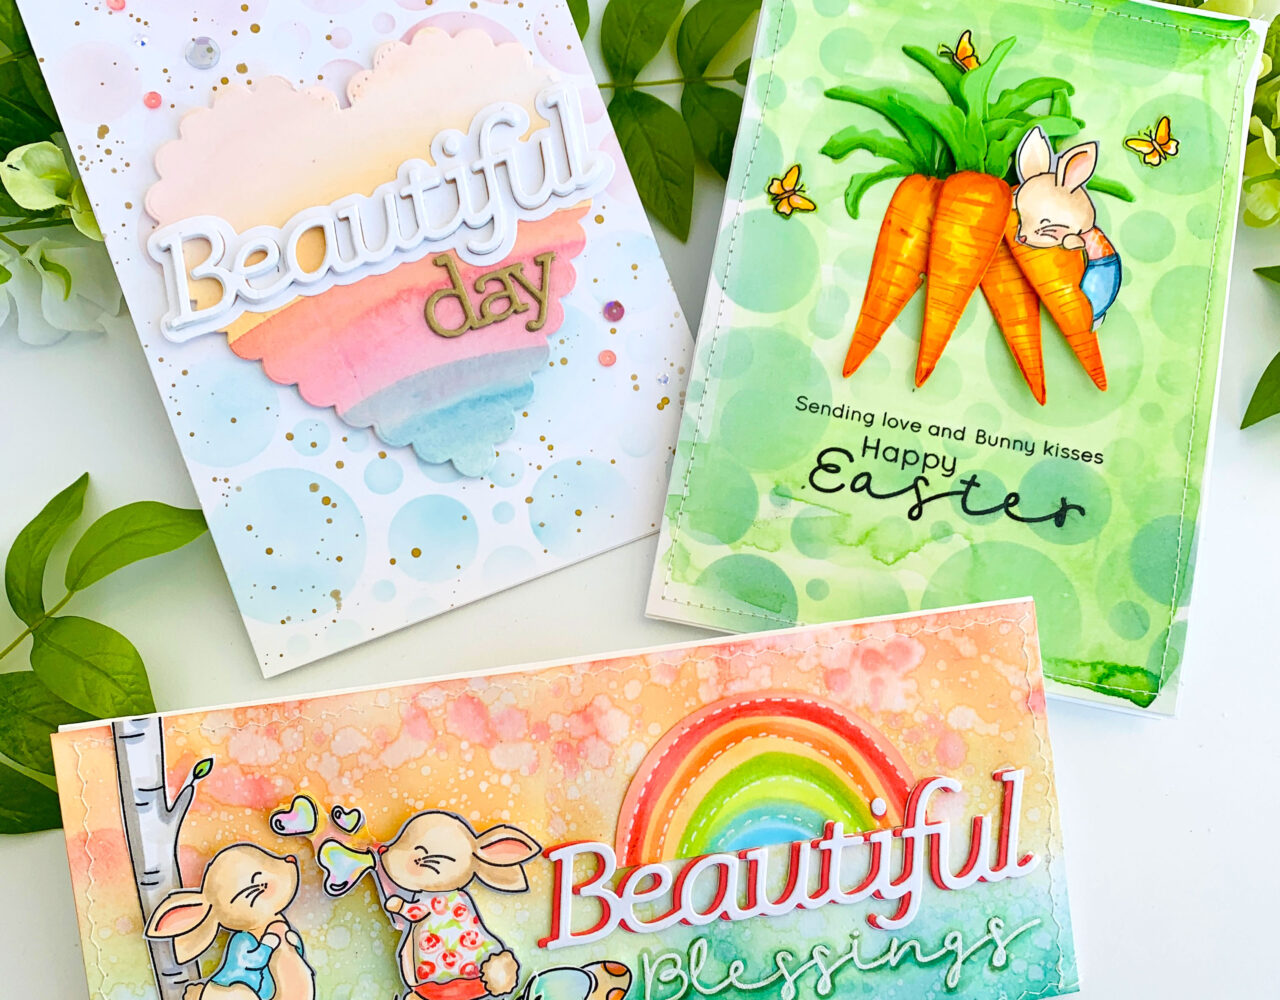
My first slimline card measures 8-1/2″ wide X 3-1/2″ tall and features the bunnies and accessories from the Bunny Blessings stamp set and the Capital B Beautiful die set. I started with a distressed ink background using Lucky Clover, Mustard Seed, Carved Pumpkin, and Abandoned Coral distressed inks. After blending the ink, I splattered water on it and blotted the background to create the splotchy look.
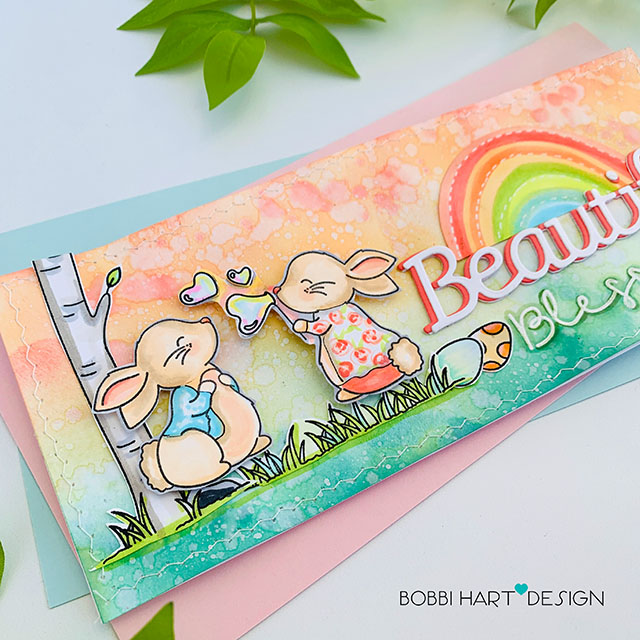
The bunnies, tree trunk, colored eggs and grassy ground were stamped, colored, cut out and positioned on the left side of the card in a scene. I used the following Copics to color the images: E42, E53, E50, BG01, BG000, R22, R20, R00, YG03, YR000, YR04, BG11, Y00, and RV02.
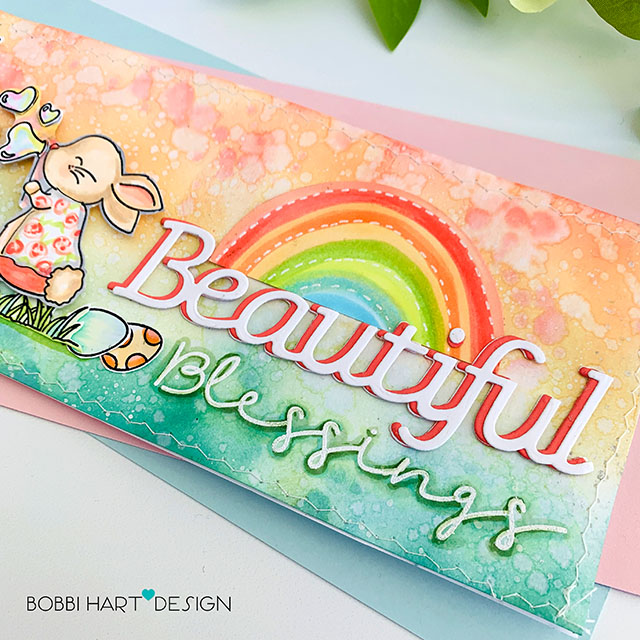
For the right side, I hand drew the rainbow using Copics: R22, R20, YR000, YR00, YR04, YG03, YG00, BG11, BG01, and BG000 on 80lb Neenah Solar White cardstock and cut it out. Right below it, I added the “Beautiful” die in coral and white, offsetting the coral shadow. I heat embossed “Blessings” in white, right below it. To make the embossed word stand out, I shadowed it with a green Copic shade. Lastly, I sewed a zigzag stitch around the perimeter of the card front and adhered it to a slimline card base made from 80lb Neenah Solar White cardstock.
Bunny and Carrot Card
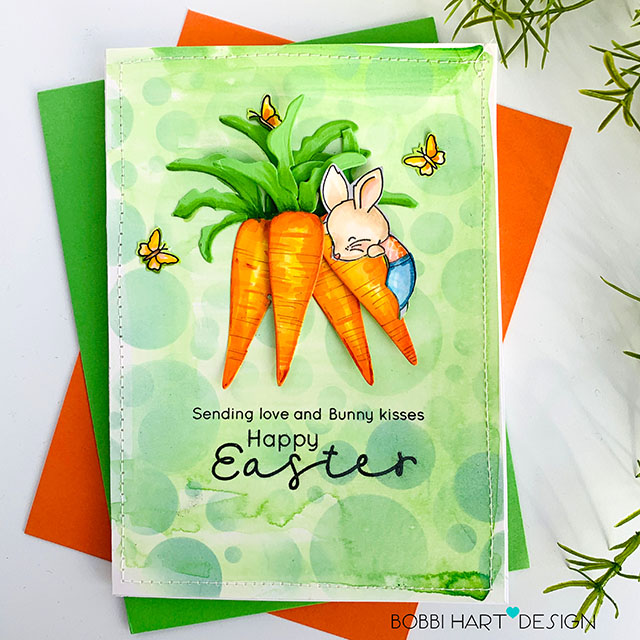
For this 5″ X 7″ card, I began with a green watercolor wash on Canson XL Bristol Smooth watercolor paper. After it was dry, I ink blended green distressed ink circles on the front using the Mix and Match Circles Stencils. I used Bundled Sage Shadow and Lucky Clover colors and rubbed gently until I had the desired look.
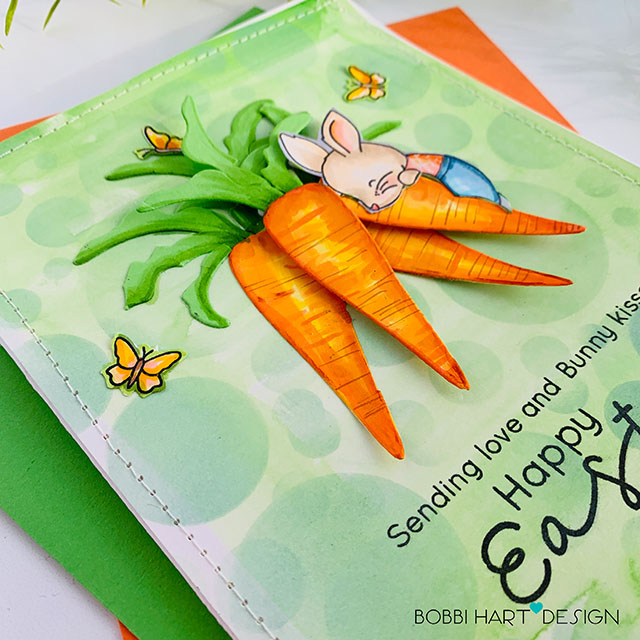
I die cut four carrots from the 80lb Neenah Solar White cardstock and colored them using oranges and greens (YR68, YR15, YR04, YG67, YG17, YG03, YG00.) I also stamped the cute bunny from the Bunny Blessings stamp set and gave him some clothes using the following colors: B45, B41, B91, R14, R22, R20, R10. I cut him out. The carrots and bunny were attached to the front using Scrapbook Adhesives White Foam Squares.
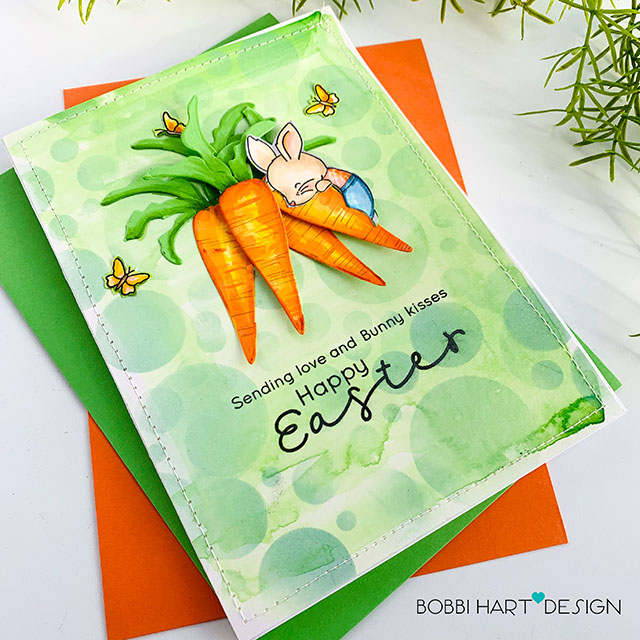
I stamped the phrases and adhered the watercolor card front to a card base using Scor-Tape double-sided .25″ tape and a simple sewing stitch around the perimeter. I like to use Scor-Tape when I’m adhering watercolor paper to a base. It holds it flat even if your paper is a little warped.
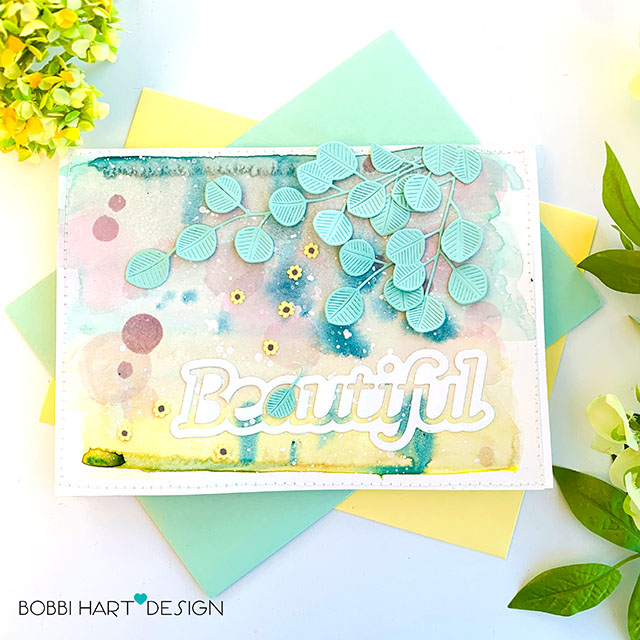
Beautiful Day Card
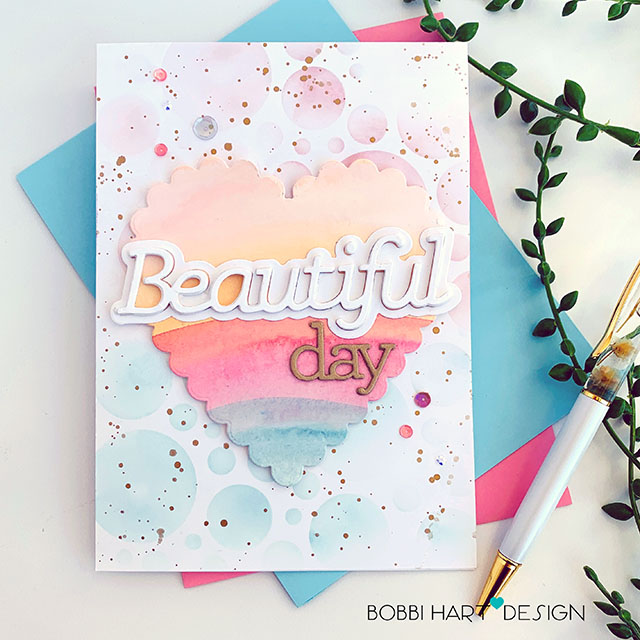
This 5″ X 7″ card features a watercolored rainbow painted on a scalloped heart shape (die cut from Canson XL Bristol Smooth watercolor paper) and placed on a 80lb Neenah Solar White cardstock card front.
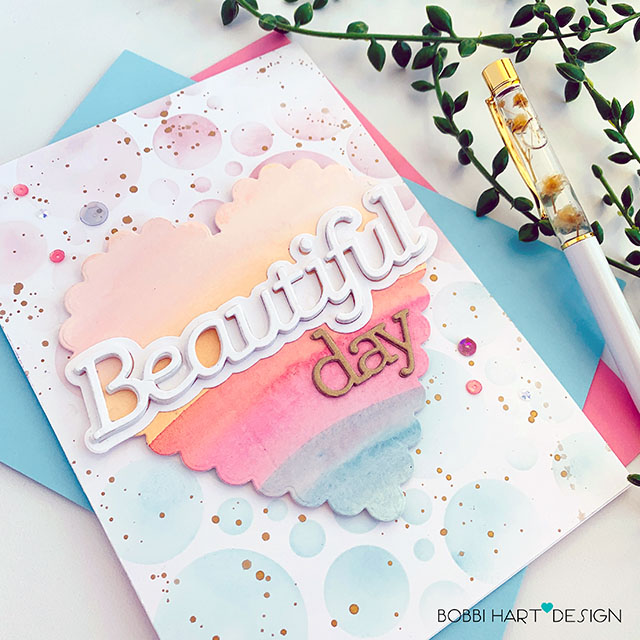
I stenciled the colorful circles on the card front using the Mix and Match Circles Stencils and distressed inks in Tumbled Glass, Victoria Velvet and Spun Sugar. I also splattered gold paint over the inked design to create the backdrop for this heart. The heart was attached using Scrapbook Adhesives White Foam Squares to make it stand out.
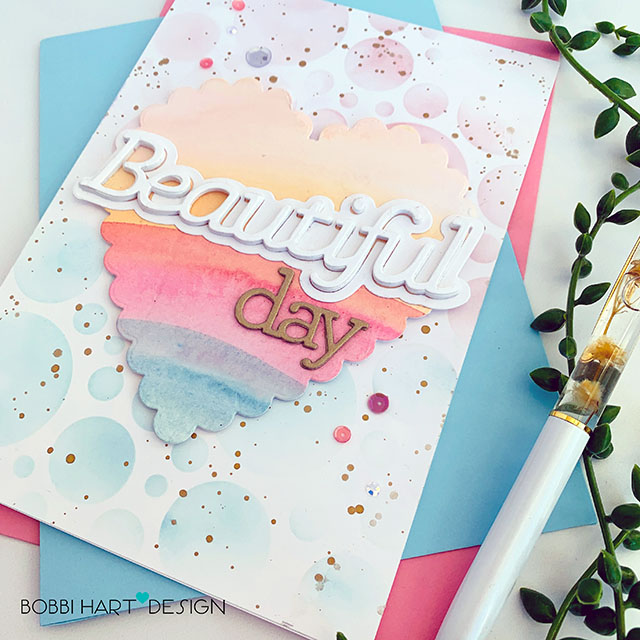
The Capital B Beautiful die was cut from white 3MM craft foam and white cardstock and glued to the heart. The “day” die cut was cut from Metallic gold cardstock (3 layers glued together) attached below the first word. I used the Happy Birthday die for the “day” letters, only. Finally the front was attached to a card base and a few lavender / rose sequins were attached around the heart for some sparkle!
More Ideas… Check these out!
In case you missed it, check these out on my Instagram page by clicking on the photos below!
Don’t forget to leave a comment before you leave my blog for a chance to win $25! Shop during the blog hop and get a free rose trio 6″ X 6″ stencil with ANY purchase. USE CODE RSE542 to get yours FREE! This promotion will expire 2/28 at 11:59 pm EST. If you decide to place an order, please use my links in this post so that Simon Says Stamp knows how you found these products. I appreciate it very much. It helps me to continue to bring more ideas to you! Your next stop is the talented, Emma Williams – see the full list in hop order, below!
Thanks for stopping by today. If you want to see more ideas and inspiration from me, subscribe to my blog, BobbiHartDesign.com. I’ll send you updates on new posts! You can also find me on Instagram as @BobbiHartDesign and on Facebook as BobbiHartDesign.
Bobbi Hartmann Lemanski, Bobbi Hart♥ Design, Adding h♥art into every design


I love the variety and beauty of your backgrounds to set off these fun sets! Great job.
I love the scenes that you have created and your ability to bring things to life like the bubbles & carrots. Thanks for the opportunity to win.
The bubbly backgrounds and beautiful colors are perfect for spring! LOVE the bunnies!
Very sweet cards
Oh wow, these cards are so beautiful, love all details 🙂
Love your cards and all the backgrounds you have created .. just gorgeous ❤️
Bobbi these are all amazing! I really love the carrot card, as I am veggie gardener. Been pouring over my seed catalogs… Love that bunny set, especially the bubbles that make hearts (swoon) Fun release and I so enjoy your work, Excellent!
Thanks for sharing such a wide variety of cute cards that really showcase the products in this new release!
LOVE all of them!
WOW! Your cards are fabulous, and I especially love your cards made using the new SSS Bunny Blessings!!
Beautiful Easter inspiration! Love the bunnies!
The Bunny Blessings is such a fun and versatile set! Wonderful cards
Wonderful cards! Love the bunny and carrots. Thanks for sharing your talent.
Beautiful cards. I don’t think I could choose a favorite because I love all of them. Great work!
TFS! Lovely cards. I especially loved the Bunny and carrots card. The dimension you achieved through coloring makes the carrots look real.
These are so cute and pretty.
Wow! You’ve been very busy!! Love all your beautiful creations!
So many beautiful cards! I love how you used the circles stencil with soft colors.
I love these! Adorable bunny slimlines!
Sweet sweet cards! Thanks for sharing.
Beautiful cards with a great variety of styles to inspire everyone!
What terrific cards. I love them. My favorite is the first card with the two bunnies. Your coloring and the backgrounds are amazing.
Gorgeous cards!! My favorites are the carrots one with the stitching and your slimline card!!
Wow! Gorgeous cards, fantastic designs! I love all of the backgrounds!
Love all the different ideas you shared! Those carrots look good enough to eat & I love the adorable bunnies!
Darling cards – an I love your creative backgrounds!!
Very nice cards. Thank you for sharing.
OMG!!! Too, too cute!!! I love your cards Bobbi!! Those carrots look real and your backgrounds are absolutely perfect!! Thanks for sharing!!
I love the bubble blowing one!!!
OMG -your cards are pure eye candy – thanks for sharing
What fun card designs, I really groove on how you used the Bunny Blessings with the carrots, so cute!
You creativity flowed with this cards. The bunnies are so cute and your backgrounds are an interesting detail.
Such a wonderful assortment of techniques and styles.
Lovely cards! Thanks for sharing!
Beautiful easter cards! Thanks for the inspiration!
Fun easter cards!
Love, love, love the bunnies! My favorite is the slimline card.
These bunnies are so cute and I love the new Beautiful set Thanks for sharing!
Feel like blowing some bubbles, playing peek a boo and eating carrots. Love the cards.
Wow!!! Soooo many Amazing cards!!! I love them all!!!
Such sweet cards. Love the detail of the flowered jacket on the bunny! Thank you for sharing?
Wow, your cards are amazing! I love them all.
Like the splattered background on Beautiful Day
Your cards are beautiful! Thank you for the inspiration!
Your cards are amazing!!!
OMG! I LOVE LOVE LOVED YOUR CARROT CARD!
The single purple bunny and the bubbles – FAV!!!!
So cute!
Love all your cards! the colors are so pretty and the coloring is perfect!
Love your sweet cards, especially the ones with the bunnies. The bunny hugging the carrot is adorable. Thanks for sharing!
You make me want to buy this whole release, such beautiful work!
Such beautiful, sweet cards. This release definitely has something for everyone!
Sweet cards. I like the colors, too.
Wow! You out did yourself and every card is a gem. If I had to pick a favorite, it would be the carrots and bunny card. All the backgrounds are amazing and you inspire me to step up mine. Thank you for sharing your amazing talent!
Fun cards!! Love the adorable bunnies!!
All your cards are absolutely adorable, but the bunny hugging the carrots just blew me away! What talent you have for making things come to life. Thank you for sharing!
Amazing cards! Love them all!
Your cards are incredible and so much fun ?
Love your colouring.
Love how you used the circles stencil. So many different variations. Thanks for sharing your ideas.
Love your creations, Bobbi! This release is just fabulous and you have used some of the products so wonderfully!!
pretty cards, oh those bunnies are super sweet!!
Love all of your colorful and well executed cards! This is just the best new Simon Says Stamp release!
You always make beautiful cards.
My goodness! So many wonderful cards.
Such creative use of the stencils. Colors are so bright and Springy.
Awwwwwwwe. These are so precious! That bunny precariously crawling through the carrots makes me smile every time! The colors are spring and this release makes me happy!!
Thank you for the wonderful ideas. Your cards make me smile!
Such beautiful card designs, love the cheerful colors!
Fantastic as always!! Thanks for sharing!
Beautiful cards I love them all! Thanks for sharing.
This is a really fun release and your card ideas are wonderful. The carrots look so dimensional on your second card and the bunny is so cute attached to them.
Awesome cards! I love those pretty backgrounds you created! Love the adorable bunnies!
Beautiful spring cards
Really love the colors on all these beautiful cards, the bunny and carrots are my favorite – really stunning.
What a happy mix of card designs! Loving the rainbow bunny card!
Such beautiful cards !!?
Those bunnies are so adorable! Love your cards!
I just love all your card backgrounds! And such sweet and cheery spring & Easter cards!
I love all of your cards, such detail.
Hi, Bobbi –
Wow, you are an amazing artist! I absolutely adore that Beautiful Blessings card. The blotchy background in oranges and greens is GORGEOUS. So, so pretty. The bunnies are cute – and their colorful, adorable outfits show your talent in and of themselves. I could try to do a pattern like that little rabbit’s coat and it would turn into a giant mess, but yours looks fabulous.
Your Easter card and the Beautiful Day card are also terrific That stencil you used for the background will be in my cart later today – if it’s not already sold out. I love the little bunny on the Easter one along with the color scheme. The Beautiful Day card is so calming to look at – very pretty and the splatters really complete it.
Thanks for sharing your talent and giving all of us viewers inspiration.
What fabulous spring time cards you’ve created! Love the adorable images and all of the bright, happy colors you’ve used!
Bunnies and carrots are like PBJ.
they go together and make such
a cute card. Love the coloring of
the heart. thanks for sharing
txmlhl(at)yahoo(dot)com
Bobbi…you gave us loads of inspiration with all of these beautiful cards! Thank you for all that you do to inspire us, ❤️
Beautiful cards! Blending and splattering Distress inks are over the top pretty. Love this release.
These are all such happy and cheerful cards, love them! The green one with the carrots and the bunny stole my heart! 🙂
I love the iridescent heart bubbles you colored on the slimline card. What a great idea. I definitely need the sss circle stencil. It works great in every card I’ve seen it in. My favorite card is the 5×7 carrot bunch. Combining the wafer die with the Bunny Blessing stamp was very creative idea. Thank you for sharing and inspiring me!
I love the bubbly card they are all beautiful
Your cards are so cute! 🙂
Bobbi, your cards are just beautiful, and these bunnies have stolen my heart!! Thanks for such great inspiration. 🙂
I love this entire release and your work, here, is beautiful. I don’t usually do animals, but how cute are those darling mice?
Such gorgeous cards! Love all of them…
Thanks for sharing.
Such cute cards! The bunny blowing bubbles is just adorable.
The bunnies look so cute. I especially like the one blowing bubbles. The actual bubble is perfect!
Wow! I LOVE the fun bunnies with the heart bubbles. So adorable. You really did a wonderful job using this new release!
Beautiful cards! I love each of them! Thanks for sharing!
Such Beautiful cards and cute bunnies. Thank you
Looks like you had a lot of fun playing with the new release. Beautiful cards.
What a lovely display of elements in this release, your backgrounds are amazing! These bunnies are so darling. Iam a new fan. Thank you for inspiring us with your talent. Pure loveliness!
your cards are amazing!!!!
wonderful variety with pretty colors.
All the cards are beautiful! Although I have to say the bunnies and carrots are my favorites!
stunning cards with amazing backgrounds!