
Hi there! Happy Friday. 🙂 What’s up? Well, I’ve been doodling… and those doodles turned into today’s background pattern. I love when silly things turn into something I love. Here’s how it all went down. I was trying to create one thing that did not turn out, only to find something that did! Love that!
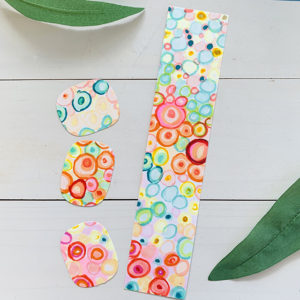 I started with filling my Copics the other day and testing them on a piece of white cardstock. I was making circular shapes in variations of colors and found I was liking the look. Next, I thought why not make a floral bouquet mosaic of this look? Well that did not turn out. Here’s the result – a bunch of circular designs, all imperfect, all colorful. I made a large enough sheet of this colorful design to use on a card.
I loved the look, but when I tried to layer anything on it, it was too bright and took away from the images. To calm it down, I layered a heavier piece of vellum paper on top. Quickly, I LOVED the look and knew I just had to use it for my card today featuring Paperie Ink’s Happy Vibes stamp set.
Pictured to the left is the remains and remnants of the cut outs from my card so you can see how bright it was before layering the vellum. It’s also very imperfect and not very “clean” looking. Perhaps, that one reason I love it. Perfection is not as important to me as it is to others. 🙂
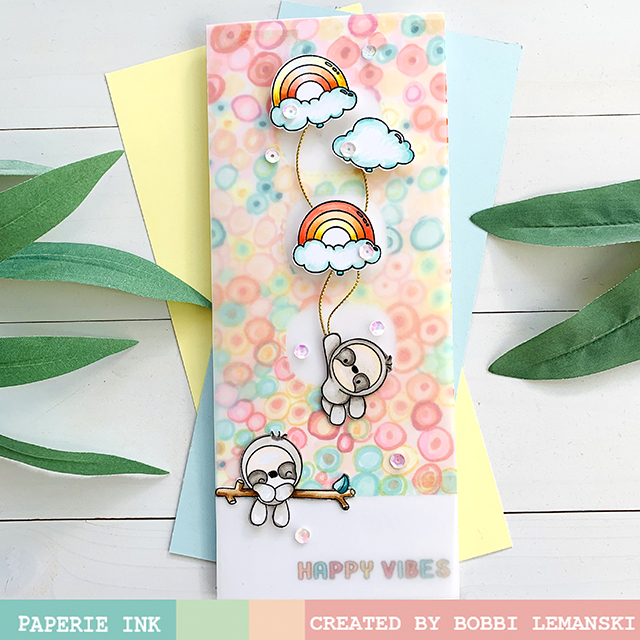
Once the cut outs were done using a My Favorite Things die cut (Available at Simon Says Stamp Stitched Triple Peek Windows die cut), I added it to a slimline card base made out of white cardstock measuring 3-1/2″ wide X 8-1/2″ tall (fits inside an A8 business-sized envelope) and stamped the phrase, “happy vibes” on the white white section, at the bottom of the card. I colored the letters in using coordinating colors. Next, I layered the velum to soften the brightness of the colors. It’s so much prettier with the vellum!
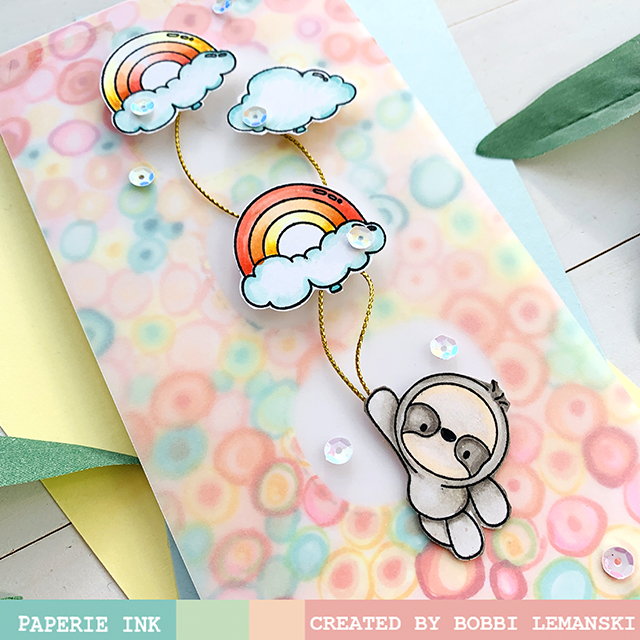
I stamped, colored and fussy cut the cute sloths and balloons from the Paperie Ink set, Happy Vibes and adhered them to the front using dimensional foam tabs. I positioned them so that they were in front of the white cut outs in the background, to make them pop more. They are smaller images so I didn’t want to lose them in the design.
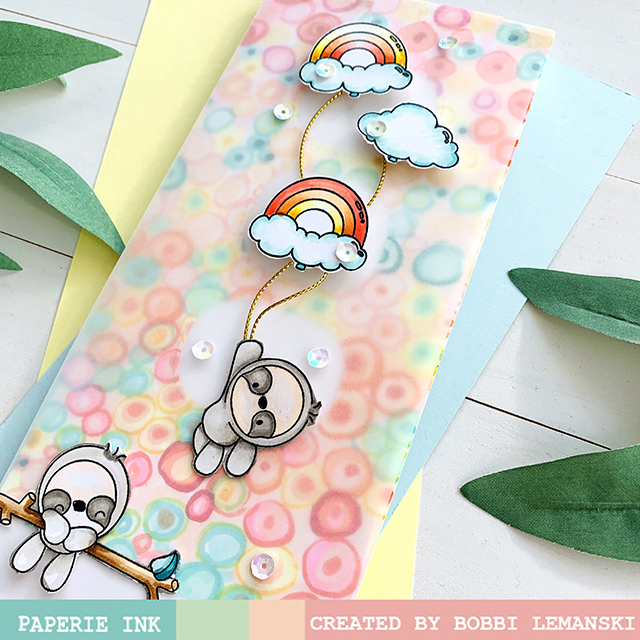
The hanging sloth was added at the edge of the colored background. He’s so cute hanging from his limb. 🙂 Gold cording was attached to the backs of the airborne sloth’s hand and the balloons for balloon strings.

Clear sequins were added to the front for a little bling. I really love the softness of this doodled background for these sweet and soft-looking images. All of the Paperie Ink designs have a sweetness about them that is hard not to love! Check out the company’s new website and all the wonderful designs available today! Thanks for visiting today.
Want to see more ideas and inspiration from me? Subscribe to my blog, BobbiHartDesign.com. I’ll send you updates on new posts! You can also find me on Instagram as @BobbiHartDesign and on Facebook as BobbiHartDesign.
Bobbi Hartmann Lemanski, Bobbi Hart♥ Design, Adding h♥art into every design


Love how the softened background turned out…pretty but not overpowering your darling images!
Thanks, Valerie. I liked it better that way, too. It was a happy surprise! Have a great day! Bobbi