

 Hello everyone! It’s time for another Instagram Hop at Simon Says Stamp. We are celebrating the Happy Camper release with a hop full of prizes and inspiration. Hop with us on Instagram. Leave a comment at each hop stop for an entry for a prize of $25 to shop online. There are 16 chances to win a $25 gift card so make sure to follow all of us and leave a comment. You can start here, at my page. I have all the stops listed so you can do a few here and there or just do them all at once. Make sure to leave a comment on my IG post for an entry! Each designer’s card post will have the “Happy Camper” watermark in the lower right corner of their featured post. (See design to left.)
My featured card showcases the following new products from the Happy Camper release:
Frankly stamp set and coordinating Frankly die set (Buy the Bundle here. Includes the large word dies, too!)
Rooting For You stamp set and coordinating die set (Buy the Bundle here.)
CZ Design Simple Stars Stencil Set
from a prior release:
I find it fun to mix up and mash stamp and die sets together. It requires some creative thinking, but often results in fun, one-of-a-kind cards! This is one where two unrelated sets get linked together with a few crafty alterations!
My card below measure 5″ X 7″ and fits inside an A7 envelope. I’m using 80lb Neenah Solar White cardstock for the card front and card base. Everything is stamped using Hero Arts Intense Black Ink. I use Simon Says Stamp Dot Runner Tape Adhesive to attach the elements together. I also like to use foam squares to create more dimension on my cards. My white Gelly Roll Pen is my go-to for adding any white highlights. Here’s the details.

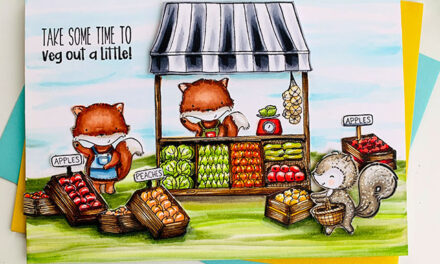
To make this 5″ X 7″ card, I picked the dill pickle and hot dog bun die from the Frankly die set and die cut two bun sides from a yellow-green / olive cardstock. I used two colors of chartreuse and olive paper for the sliced dills. I added detailing to the die cuts using Copic Markers in YG95, YG93, YG 91 and a white Gelly Roll Pen. I would say this hot dog now looks like one uncut dill pickle to match the sliced cuts! I set these dills aside to work on the next part.
Using the character stamps from the Rooting For You stamp set and coordinating die set (Buy the Bundle here.), I stamped, die cut and colored these cute little gardeners. They will be growing the cucumbers for the big dills. To tell the story of how the “big dill” came to be, I started with the dirt hauler with the wheel barrel, the seed packet holder, the digger and finally the harvester. I arranged them in this sequence and used the Postage Collage Cover die, cut from a warm gray colored cardstock to create “story boards” for them. I cut off the edges off the postage die and cut it down to four sections to fit each phase of the growing process. I attached it to a white card base and then attached each character in the sections using a foam tab to make them stand out from the background. The characters were colored using Copics in cool grays (C5, C3, C1), black (100), warm earthy browns (E42, E55, E57, E44), oranges (YR68, YR09, YR15, YR27, YR24, Y21) and greens (YG95, YG93, YG91).
Some crafty alterations… I hand wrote “cukes” on the seed packet using a fine-tip black marker. I also changed out the carrots for cucumbers for the harvester. I simply snipped off the greens from the existing carrots and and hand drew one to place over the greens I could not snip off. This is a super easy way to change the veggies!

I stacked the dills below the character board and used foam tabs under the dill slices to pop them up a bit. I added one more “rooter tooter” on top attaching him using a foam tab. I chose the pup with the fork to top off the dills. He is ready to eat one. I stamped, die cut and attached the word, “Frankly” under the dills. and stamped the “You’re kind of a big dill” below it, right on the card base. Lastly, I stenciled stars using the CZ Design Simple Stars Stencil Set, Carved Pumpkin Distress Oxide Ink and my orange blender brush on a separate piece of white cardstock. I hand cut nine stars out and attached them to the card front to finish it.
Check out these cards on my blog here, too!


If you decide to place an order, please use the links in this post so that Simon Says Stamp knows what inspired you. I appreciate it very much. It helps me to continue to bring more ideas to you!
Thanks for stopping by today. If you want to see more ideas and inspiration from me, subscribe to my blog, BobbiHartDesign.com. I’ll send you updates on new posts! You can also find me on Instagram as @BobbiHartDesign and on Facebook as BobbiHartDesign.
Bobbi Hartmann Lemanski, Bobbi Hart♥ Design, Adding h♥art into every design


