

 It’s time to party! Let’s celebrate the Simon Says Stamp STAMPtember 2025 event with a blog party! Designers around the world will be sharing design inspiration and ideas with you as well as very special offers! Check out each designer to see what offer they have in store for you. At Bobbi Hart Design, the offer is a “FREE with a $100+ purchase.” It’s a new exclusive stamp set and coordinating dies. The code to use is included in the graphic to the right. Follow the steps to claim the freebie with your qualifying purchase.
To get the party started, I’m sharing some fun cards using new products from the STAMPtember release. The products I used are the following:
- You Got this EZ Strips and Stamp set
- Wild Birthday stamps and coordinating dies
- Mod Forest Embossing Folder
- Curvy Background Stamp Set
- Pretty Bows 2 Dies
These cards are all 5″ wide X 7″ tall (A7). The card bases are made from Neenah 80lb Classic Crest Solar White cardstock available at Simon Says Stamp. Everything is stamped using Hero Arts Intense Black Ink. I use Simon Says Stamp Dot Runner Tape Adhesive to attach the elements together. I also like to use foam squares to create more dimension on my cards. My white Gelly Roll Pen is my go-to for adding any white highlights. Here’s the specific details for each card.

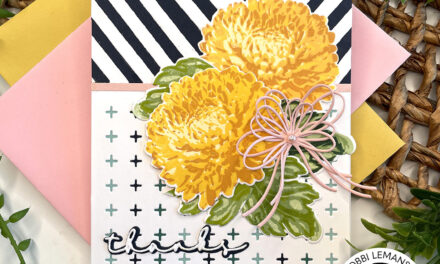
This 5″ X 7″ card features the new Curvy Background stamp set and Wild Birthday stamps and dies. I used two stamp pads to ink up the sentiment for a two-tone effect. I love the Curvy Background stamp stamped in just black on white for a black and white background. It allows the lion and bold, orange balloon to really stand out.
You might be wondering how I stamped these two together. I actually stamped the tiger and balloon separately and die cut it to layer on top of the Curvy Background design. I did some fine cutting to make sure it did not have white around the animal and balloon. It looks like a one layer card, but it is really a two layer card. I did add a foam dot under the balloon to make it stand out.

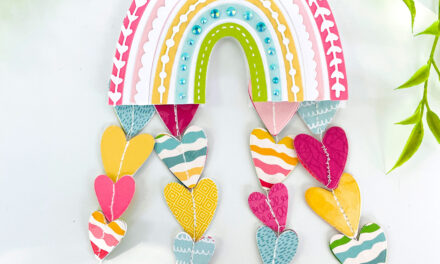
The “let’s party” birthday card was made using the bird from the Wild Birthday stamps and coordinating dies. I added a big bow to the candle that the bird is perched on. I used the Pretty Bows 2 Dies to make the red bow. The background is made using the stars stencil from the last release called, CZ Design Simple Stars Stencil. I splattered some blue watercolor paint over the stars for added interest.

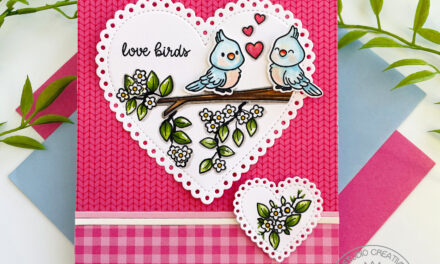
I am totally in love with this card. I love how fresh the green looks on the white. I used the Mod Forest Embossing Folder and added leaves to each embossed tree. These leaves anyone can do… they are just dots of green colors. I used my Copic Sketch Marker to create the dots. The sentiment is from the You Got this EZ Strips and Stamp set. The yellow bow was made using the Pretty Bows 2 Dies. A yellow bow represents “hope for a safe return.”

This 5″ X 7″ card was made using the Mod Forest Embossing Folder. I embossed a light aqua cardstock and then added color to each tree using Copic Sketch Markers. I added sentiments using the You Got this EZ Strips and Stamp set. I stamped and die cut them from a natural white cardstock.

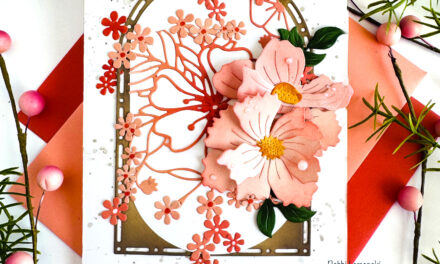
This last card was made using the Curvy Background Stamp Set. I embossed the trees in white using the Mod Forest Embossing Folder. I hand cut the trees out using a scissors and added dots of color on each other one for leaves. Of course a little bling is fun, too. I added pearl gem stickers to add some fun and color. The sentiments were stamped and die cut using the You Got this EZ Strips and Stamp set.
I hope you were inspired by these ideas. You can shop here now!
If you decide to place an order, please use the links in this post so that the companies know what inspired you. I appreciate it very much. It helps me to continue to bring more ideas to you!
Thanks for stopping by today. If you want to see more ideas and inspiration from me, subscribe to my blog, BobbiHartDesign.com. I’ll send you updates on new posts! You can also find me on Instagram as @BobbiHartDesign and on Facebook as BobbiHartDesign.
Bobbi Hartmann Lemanski, Bobbi Hart♥ Design, Adding h♥art into every design


Bobbi, I’m such a fan of your style. Love all these cards!
Thank you, Amy! I appreciate it!
I really like how you used all these products. Cool creative style.
So glad. I had fun stuff to work with for STAMPtember!
I love how you used the embossing folders for such cool effects! Great cards!
Wow! Awesome cards!
All your cards are fabulous, but my fave is the tiger on the black and white background
Great cards. Love your ideas.
How fun and stunning cards!! Love your style and the techniques used for them! thank you for sharing!
These cards are so fun and whimsical!
Wow! Great cards and LOTS of inspiration for us! Thanks for sharing your talent with us!
Love all of your cards!! The colors and design are fantastic!! Thanks for sharing and inspiring!
I love all. of these cards! I love the bright animals and whimsical trees.
I REALLY, REALLY love all of your cards!
The background stamps and embossing are gorg!
Love both ways you did those trees! Thank you for sharing.
Love all of your cards, super creative and beautiful!
Love that tiger card-it is so dynamic!
Great inspiration on the tree embossing folder!
Really Beautiful cards!!!!
I love your cards, I look forward to your IG posts!
That background stamp is so effective in all those different ways. Love the sweet tiger, Lee Holland’s art is unmistakable! Gorgeous, gorgeous creations xoxo
Stunning cards!!
Love your cards!
These cards are all so fun! I love every one of them!
I really like the unique way that you did the trees on the embossing folder! Love that idea!
Love that little tiger card so much!