

We are celebrating the new “Merry Moments” holiday release from Honey Bee Stamps with an Instagram Hop. Gain lots of inspiration and some “how-to” information by hopping to each designer’s Instagram page. Get a look at all the exciting items in this Christmas release and leave a comment at each stop on the hop for a chance to win one of two $50 gift cards. Winners will be drawn from the comments on the hop. Winners will be drawn on 11/9/2025. You can start the hop here, on my Instagram page.
My holiday card features the following Honey Bee Stamps products:
Lovely Layers: Nutcracker Honey Cuts dies
Lovely Layers: Sleigh Bells Honey Cuts dies
Frosted Filigree 3D Embossing Folder
Simply Stated stamps and coordinating Honey Cuts dies
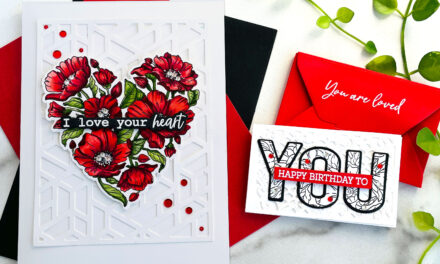
For the basics… my Honey Bee Stamps featured project below is made from Neenah 80lb Solar White cardstock for the card base and card front panel. All of the black ink stamping was done using Honey Bee’s Bee Creative Intense Black Ink. I use Honey Bee Stamps Bee Creative Precision Glue and for when I want more dimension, Bee Creative Foam Dots With Tab for adhering my elements together. My blender brushes (large and small) are a must for ink blending color on the background, too. For white highlights, I use my white Gelly Roll pen. My card is 5″ X 7″ in size.

To make this 5″ X 7″ greeting card, I started by embossing the background front panel using the Frosted Filigree 3D Embossing Folder. To “antique” it, I added a little color in Distress Oxide Ink Antique Linen to accentuate the filigree design using my blender brushes (large and small) . I also added Bronze pearl gem stickers to the curvy designs to accent the dimensional design.
Next, I made the nutcracker using the Lovely Layers: Nutcracker Honey Cuts dies and black, red, maroon and metallic gold and white cardstock. I assembled the nutcracker and attached it to the embossing panel using Bee Creative Foam Dots With Tab.

I added some brown evergreens, gold bow, and a pine cone with snow using the Lovely Layers: Sleigh Bells Honey Cuts dies. I stamped and die cut the a sentiment using the Simply Stated stamps and coordinating Honey Cuts dies and attached it to the side of the nutcracker. I attached the front panel to a white card base.

Here’s another fun nutcracker card using a different set of colors. I added some presents next to the nutcraker. I also used nutcracker pattern paper from the Merry Moments paper pad. The wreath paper around the head of the nutcracker was cut in a circular shape from the FREE BEE paper below. Learn how you can get your FREE BEE next!

You can shop the entire Honey Bee Stamps, Merry Moments release. If you decide to place an order, please use the links in this post so that Honey Bee knows which ideas inspired you! When you spend $100 or more, you are eligible for a FREE BEE, too! (While supplies last!)
Thanks for stopping by today. If you wan to see more ideas and inspiration from me, subscribe to my blog, BobbiHartDesign.com. I’ll send you updates on new posts! You can also find me on Instagram as @BobbiHartDesign and on Facebook as BobbiHartDesign.


