
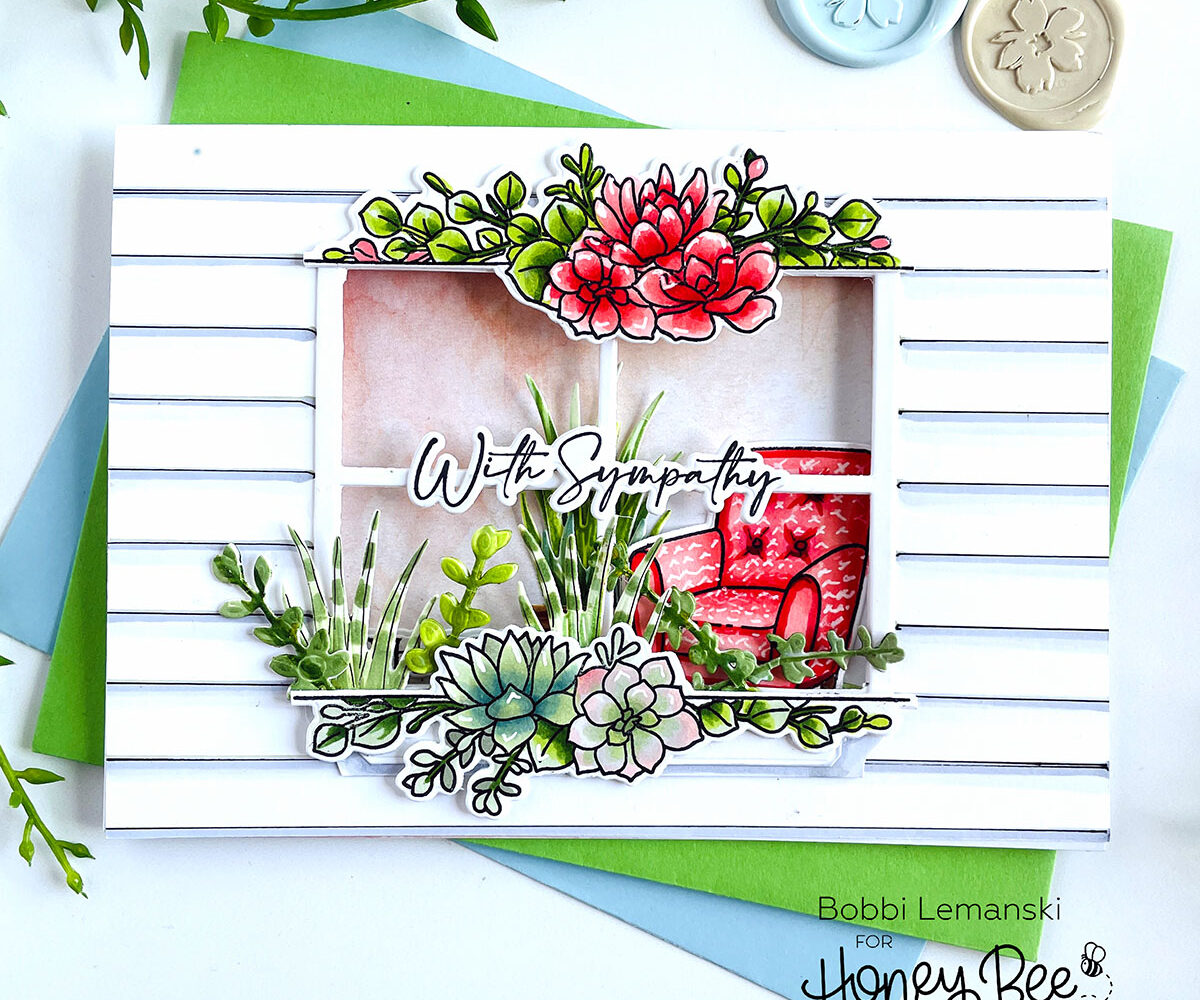
Hello Bee friends! It’s Bobbi Lemanski with a card today featuring a window full of foliage and blooms. I wanted to use a couple of new sets together and came up with the idea of a window scene. I used a “with sympathy” phrase on my card, but this could easily be used for “just a note” phrase, thinking of you, get well soon or a birthday card. This card offers a warm and sweet feel for any occasion. With the comfy lounge chair and greenery and flowers all around, it has a warm feel, just like a big hug. 
I’m using the following Honey Bee Stamps products for my card:
One the Line: Succulents stamp set and coordinating die set
Succulent Garden Builder die set
Sweet Nursery stamp set and coordinating die set (for the chair, only)0
Rock-a-Bye Baby dies (for the rug, only)
Marvelous Moments 6“ X 8–1/2“ paper pad
The featured project below is made from Neenah 80lb Solar White cardstock for the card base and card front panel. All of the black ink stamping was done using Honey Bee’s Bee Creative Intense Black Ink. I use Honey Bee Stamps Bee Creative Precision Glue for adhering my elements together. My card is 5″ X 7″ in size. Now for the details…
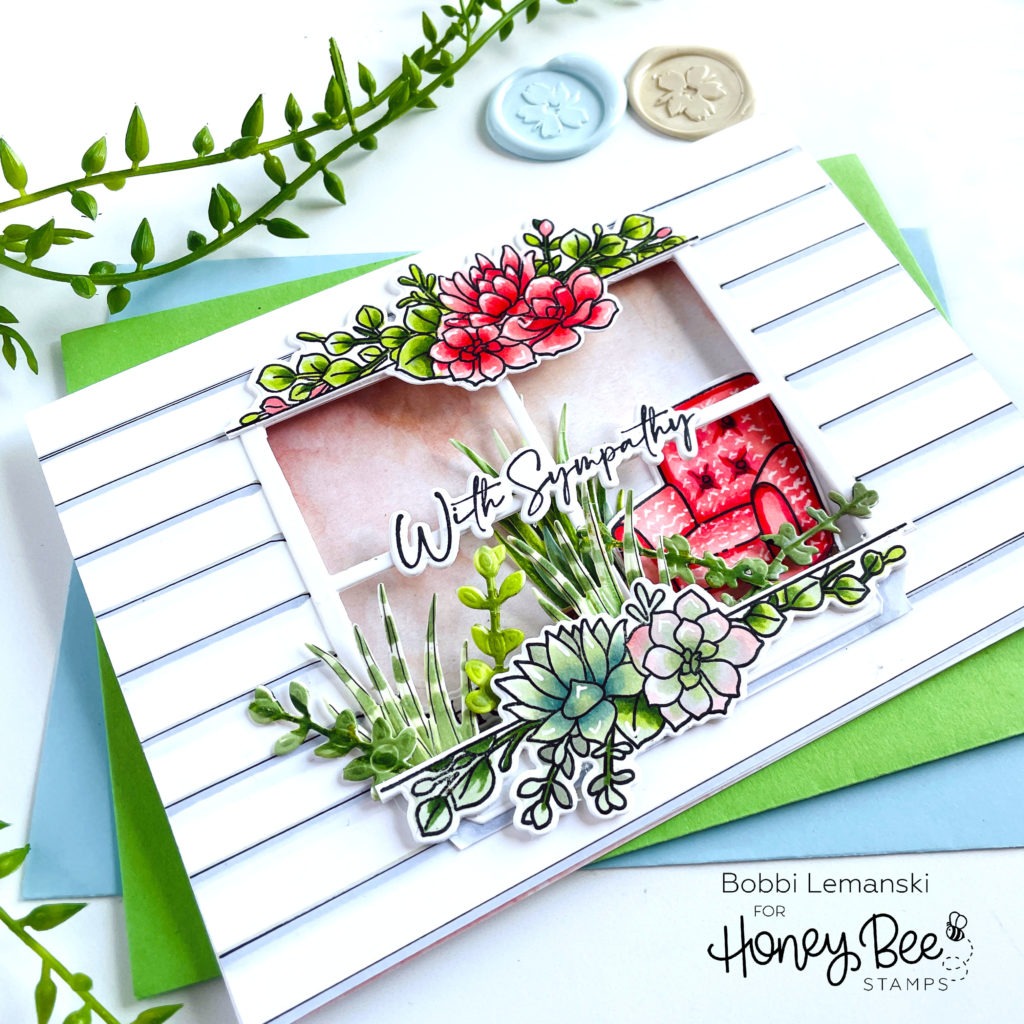
For this 5″ X 7″ card, I started by adding a window to the front panel. I used the retired, Honey Bee Cottage Window die set. If you don’t have that one, you could easily die cut a rectangle and add a frame and sash to make a window. I also used the flower box from the same set for the lower part of the window. I extended it a bit by adding another longer piece behind the box die cut. Easy peasy! Next, I added faux siding to the front panel by using a ruler and a marker to add horizontal lines and then shading below each line with Copic Markers C3 and C1.
I stamped, die cut, and colored both of the flower sprays from the One the Line: Succulents stamp set and coordinating die set. I used the following Copic colors to color the flowers and foliage:
- Reds: R46, R29, R22, R21, R20
- Greens: YG67, YG63, YG61, YG03, G20
- Blue-Greens: BG93, BG72, BG11
I attached one spray above the window and one below it. I needed some taller foliage for the window box so I used the Succulent Garden Builder die set to die cut some greenery to add to the mix. I love this set because the foliage is so pretty to add to just about any scene! (I used it last week on my underwater cave here.) I colored the tall spikes to look like snake plants v. succulents. It works!
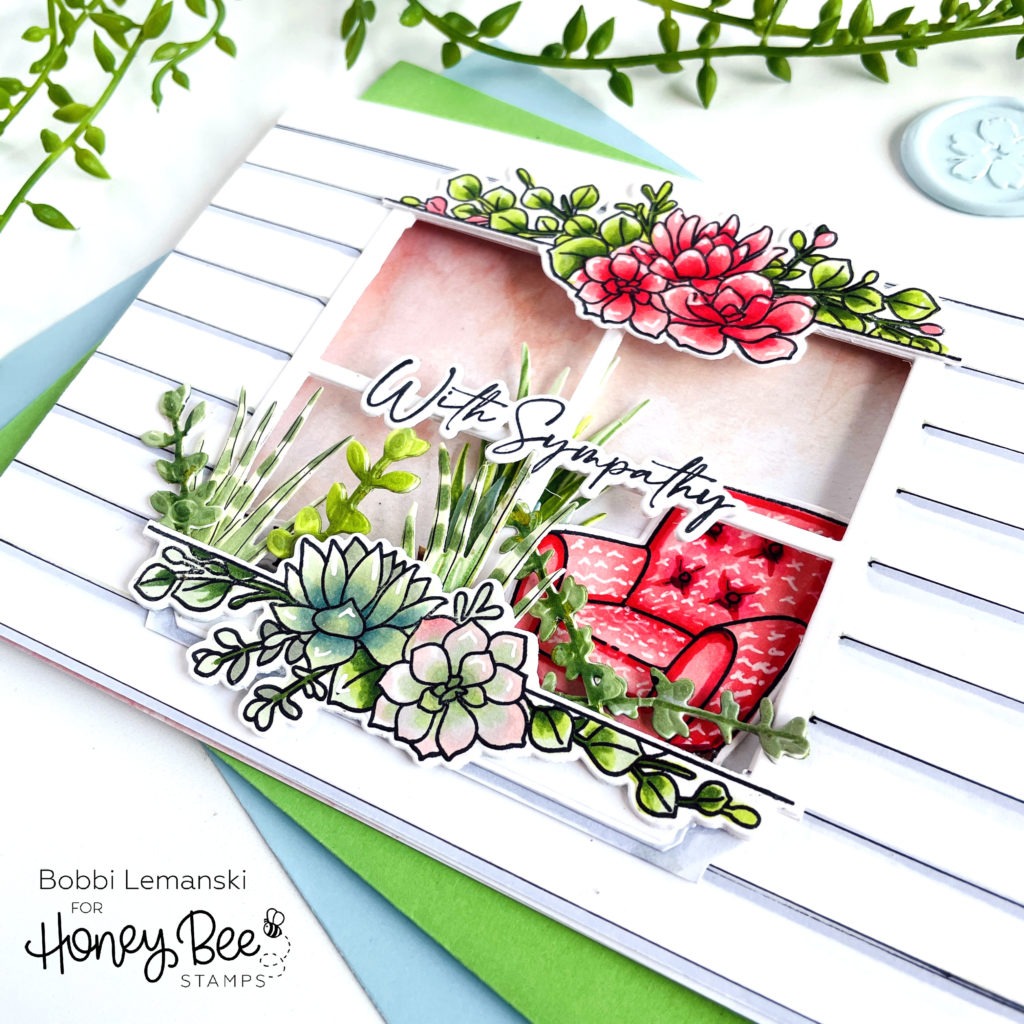
I attached the “with sympathy” phrase from the One the Line: Succulents stamp set and coordinating die set to the center of the window to finish the front. If you peek inside the window, you’ll see a cozy chair. Let’s go inside and check it out…
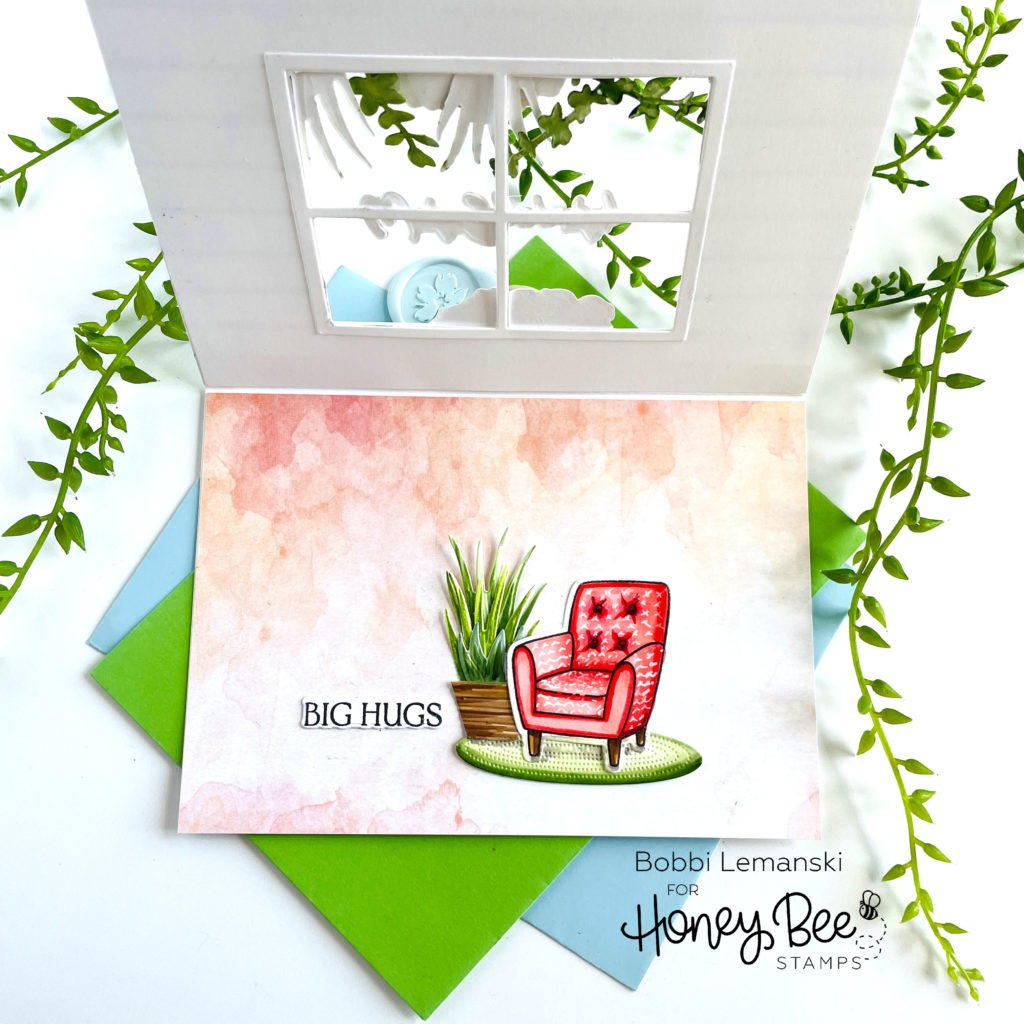
Inside the card, I added a pretty watercolor background from the Marvelous Moments paper pad. It looks like a beautiful wallpaper inside. I love this new pattern paper pad because it it a NEW SIZE! This pad is 6″ X 8-1/2″ size so it covers a 5″ X 7″ card panel. This is so amazing! I love it because I’m an A7 cardmaker.
In addition to to the paper background, I added a chair, rug, and a potted plant in a container. The rug is from the Rock-a-Bye Baby dies set and the chair from the Sweet Nursery stamp set and coordinating die set. I used more foliage and a pot from the Succulent Garden Builder die set to create the plant and planter. I added the “big hugs” phrase to the inside from the One the Line: Succulents stamp set and coordinating die set.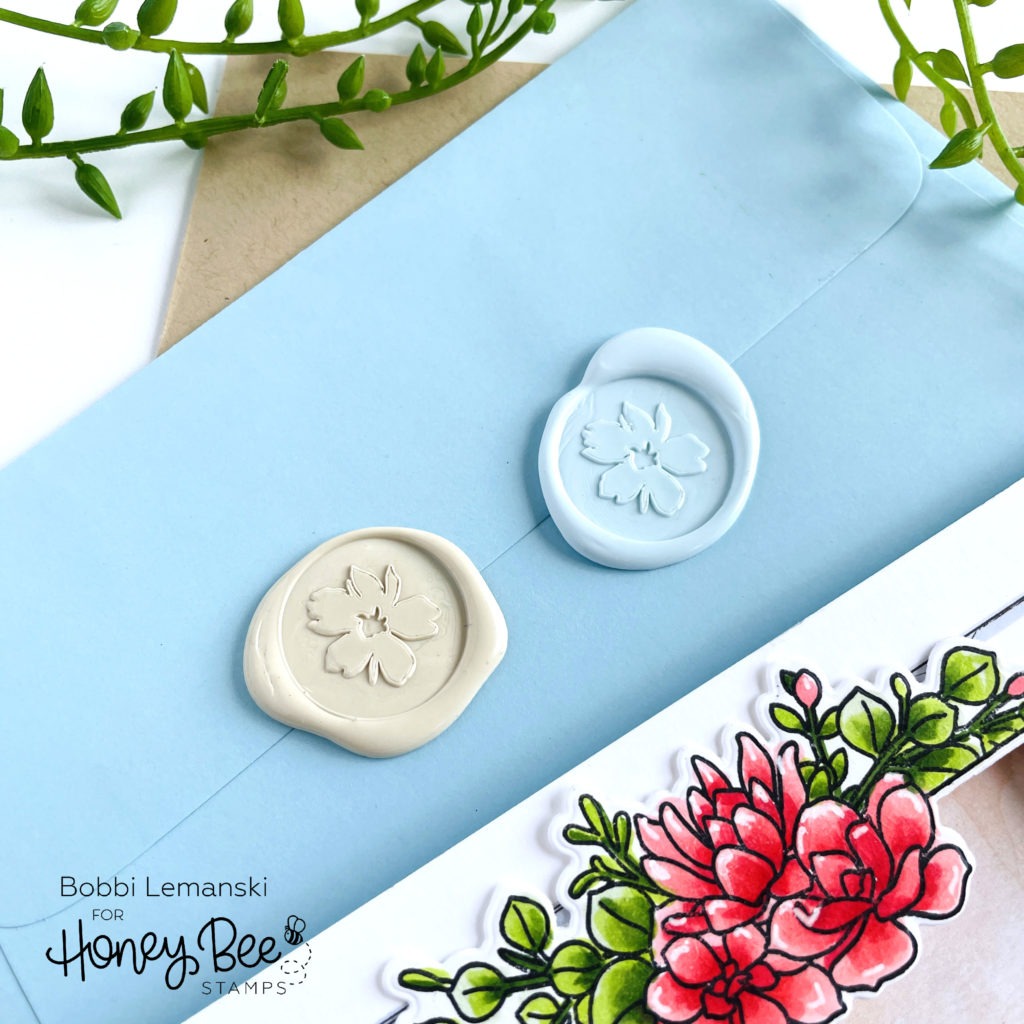
A cute little wax seal “seals” this card up. I used the Painted Bloom Wax Stamper and Vitamin Sea Wax Melts in a blue-gray and tan to make these two seals. I think both could be the perfect coordinated touch to this card.
You can shop the entire Honey Bee Stamps Perfect Day release here. If you decide to place an order, please use the links in this post so that Honey Bee knows which ideas inspired you!
Thanks for stopping by today. If you want to see more ideas and inspiration from me, subscribe to my blog, BobbiHartDesign.com. I’ll send you updates on new posts! You can also find me on Instagram as @BobbiHartDesign and on Facebook as BobbiHartDesign.


