
 Hello friends! It’s Bobbi Lemanski here, celebrating the Simon Says Stamp Holiday Sparkle release by participating in an Instagram hop today. I’m using the sets from this magical release:
Billow Snowflake Embossing Folder and coordinating dies
Magical Christmas stamp set and coordinating dies
YOU COULD WIN! Hop along with us on Instagram today for a chance to win a $25 gift card to use at Simon Says Stamp. Leave a comment at each stop because one commenter will win at each stop! You can start the hop here.
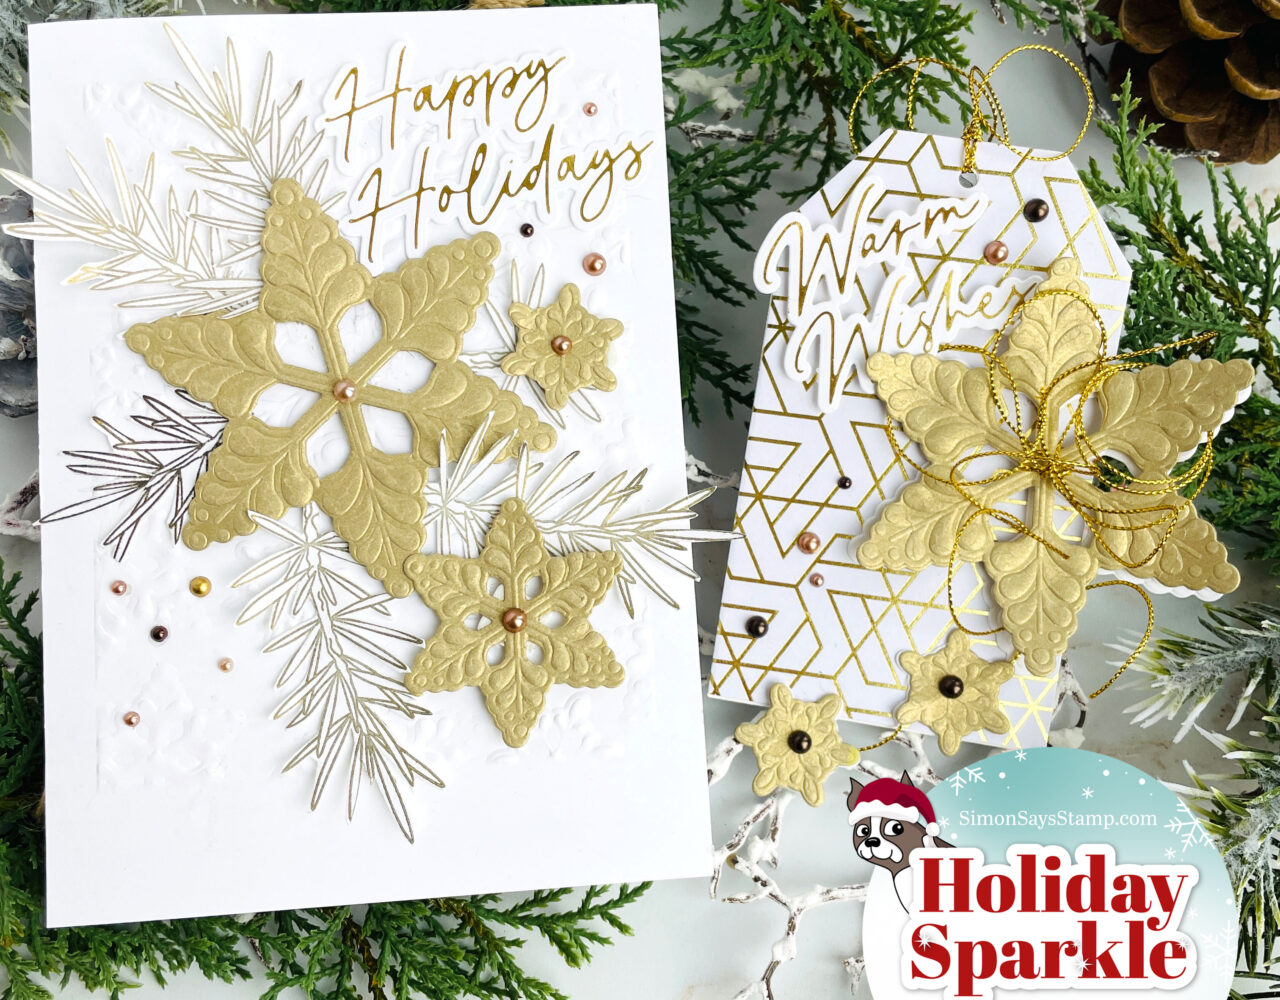
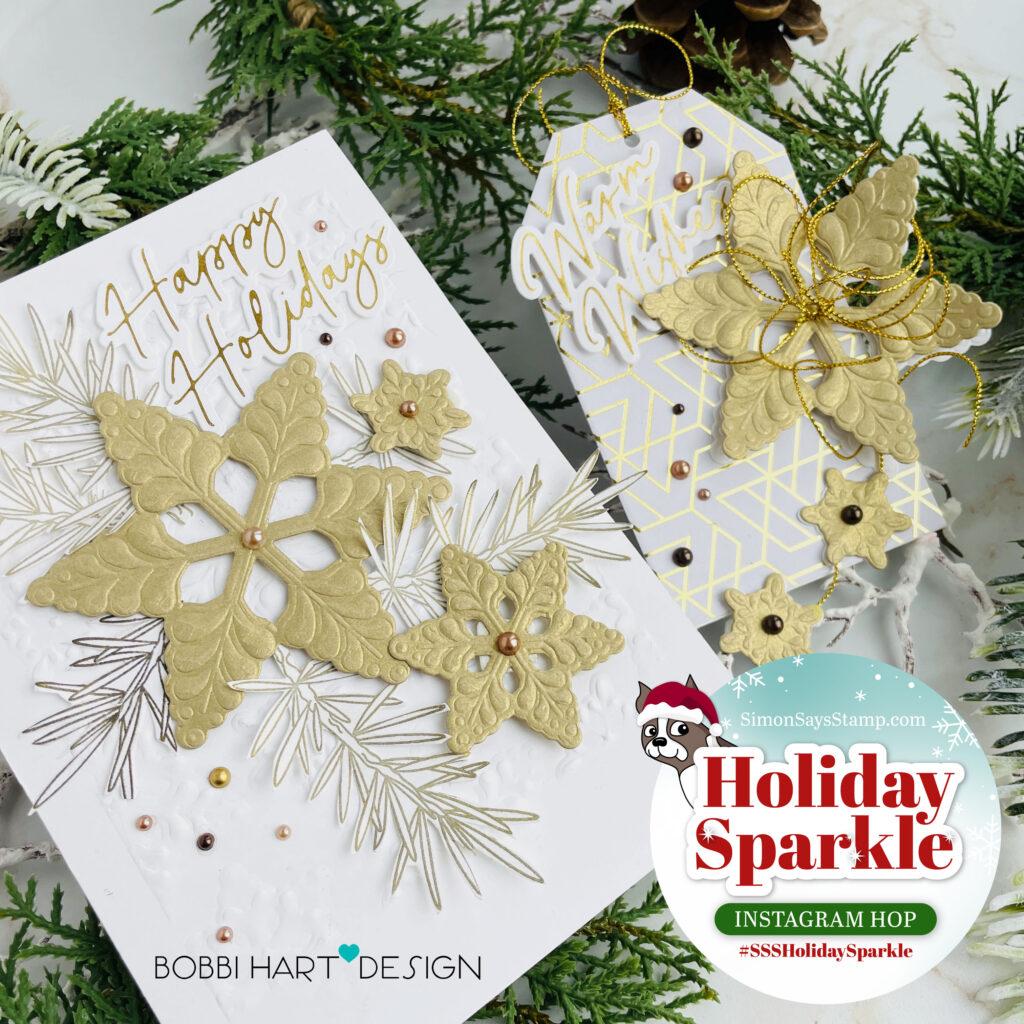
I have two projects to share today. I’m using Neenah 80lb cardstock for these projects as well as Honey Bee Stamps Gold Metallic Ink, pearls and more. I’ve provided all the links below in case you’d like to give this idea a try! Let’s begin with my 5″ X 7″ card.
Happy Holidays Card

For this A7 card, I ran my white cardstock card base through my Gemini (full size embosser) with the Billow Snowflake embossing folder to create the snowflake background.
Tip: You could also just run a smaller piece of cardstock through an embossing machine and then attach to a card base. The full card base does require the bigger Gemini machine to handle the paper size.
I also ran a few more smaller pieces through in metallic antique gold and white for the individual snowflakes. I cut them out using the dies that come with the embossing folder.

I stamped four evergreen branches from the Magical Christmas stamp set using Honey Bee Stamps Gold Metallic Ink. This ink product is new and works so well! the pad is firm, ensuring a good ink level on your stamps. I fussy cut my sprigs out, but you can use the coordinating dies to quickly cut them out, too. I also foiled and die cut the “Happy Holidays” sentiment using Honey Bee’s Foil Script: Holiday Hot Foil Plate and Honey Cuts. The dies come with the plate. There’s so many nice phrases. You’ll see I used the “Warm Wishes” on the tag below, too. I used Spellbinders Glimmer Gold Foil and the Spellbinders Glimmer Hot Foil System to create these exquisitely, shiny sentiments.
With all the elements ready, I assembled my card using Honey Bee Stamps Bee Creative Precision Tip Glue to glue the elements in place. I also used Scrapbook Adhesives foam squares to attach the snowflakes for added dimension. Lastly, I added some pretty pearls from the Honey Bee Holiday Pearl Stickers and the Autumn Pearl Stickers packages. I used a combination of three colors – a gold, bronze and rose gold color. Look at all the dimension in these snowflakes! Wow!
Warm Wishes Tag
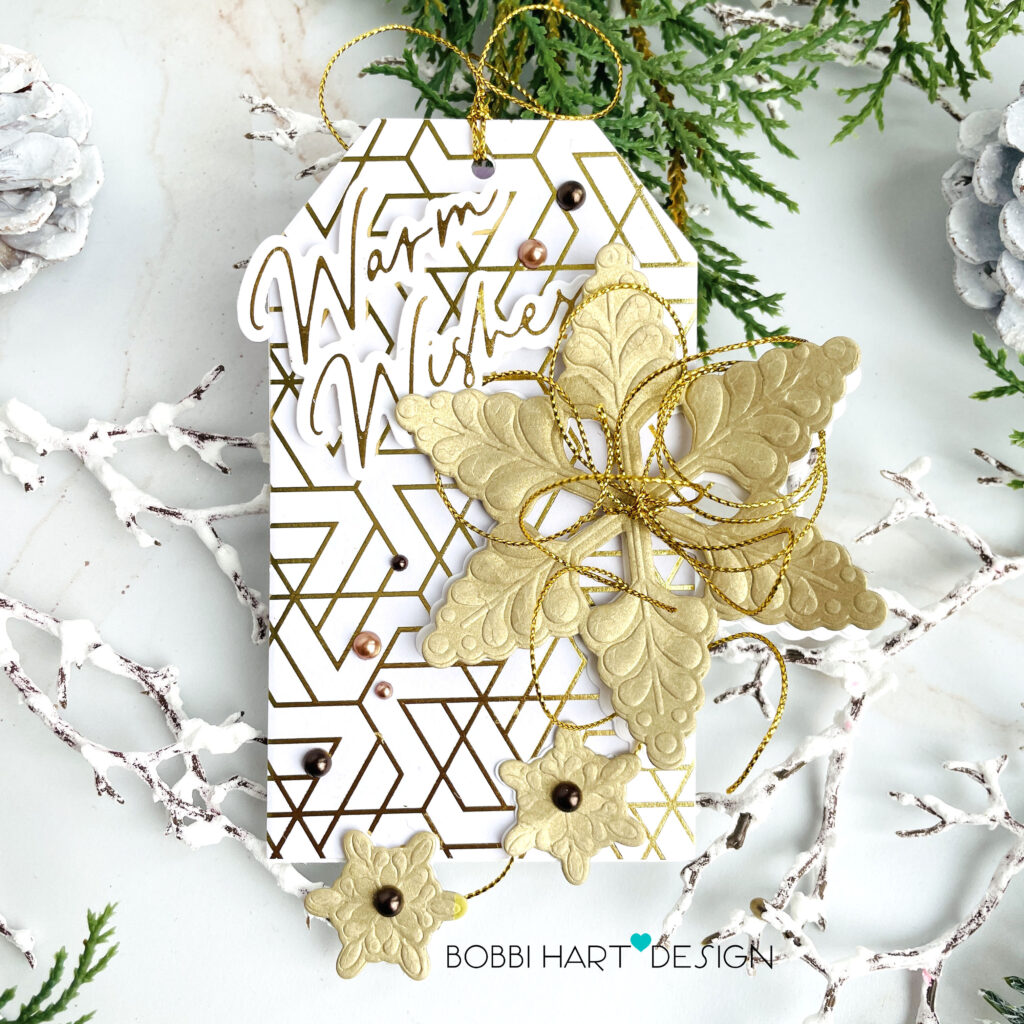
For the tag, I used many of the same elements as on the card. The Tag die is the largest die in the Hero Arts Nesting Tags dies set. If this one is out of stock, here’s another great option Nested Tag dies by CZ Design and My Favorite Things Stitched Tags set. Ooh, I love that stitching on these dies, too! I used a scrap piece of white/gold metallic paper for my background, but you could make this tag in any cardstock you like including using the Billow Snowflake folder for a dimensional one!
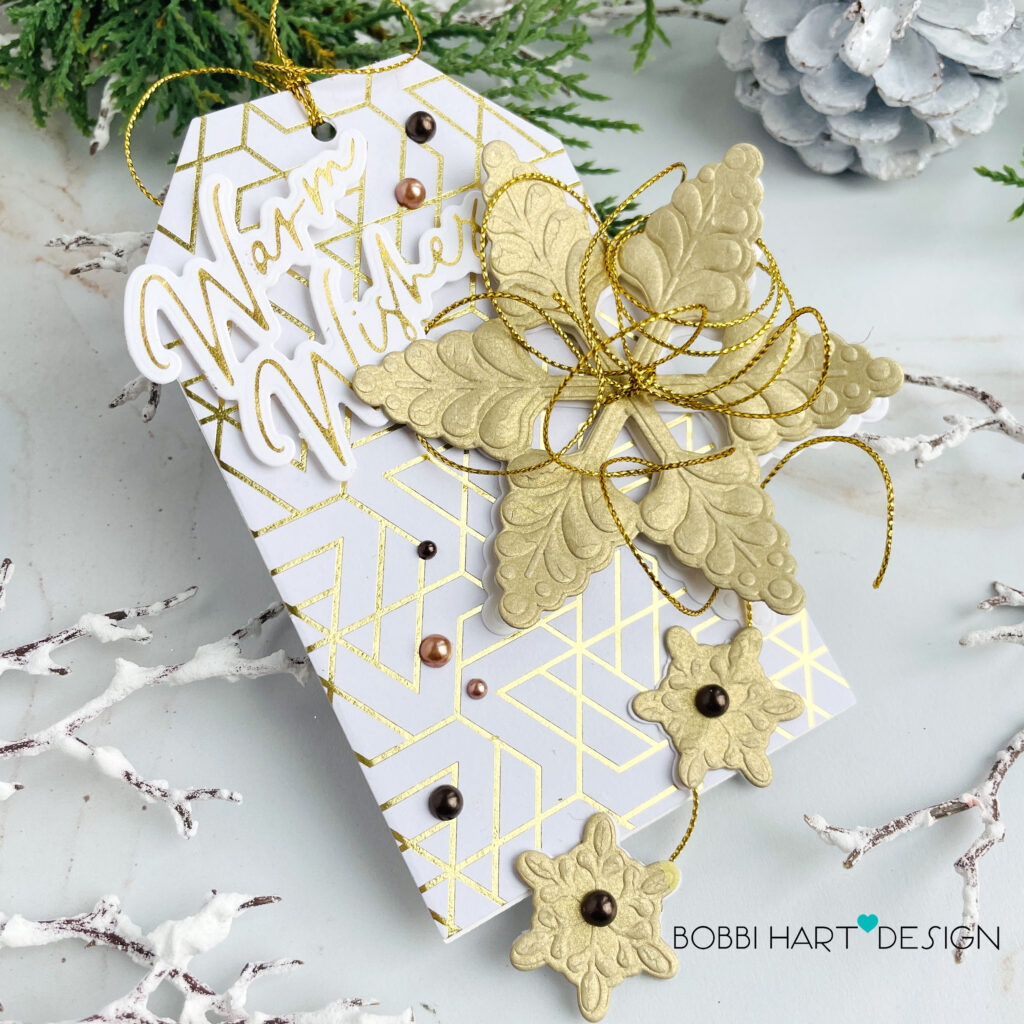
I attached the two smaller snowflakes to the bigger snowflake with metallic gold cording and let them hang down. It gives the tag some movement when on a wrapped present or holiday bag. I have had this for a long time and I think it is available online if you search for metallic string. Here’s one I found on Amazon.
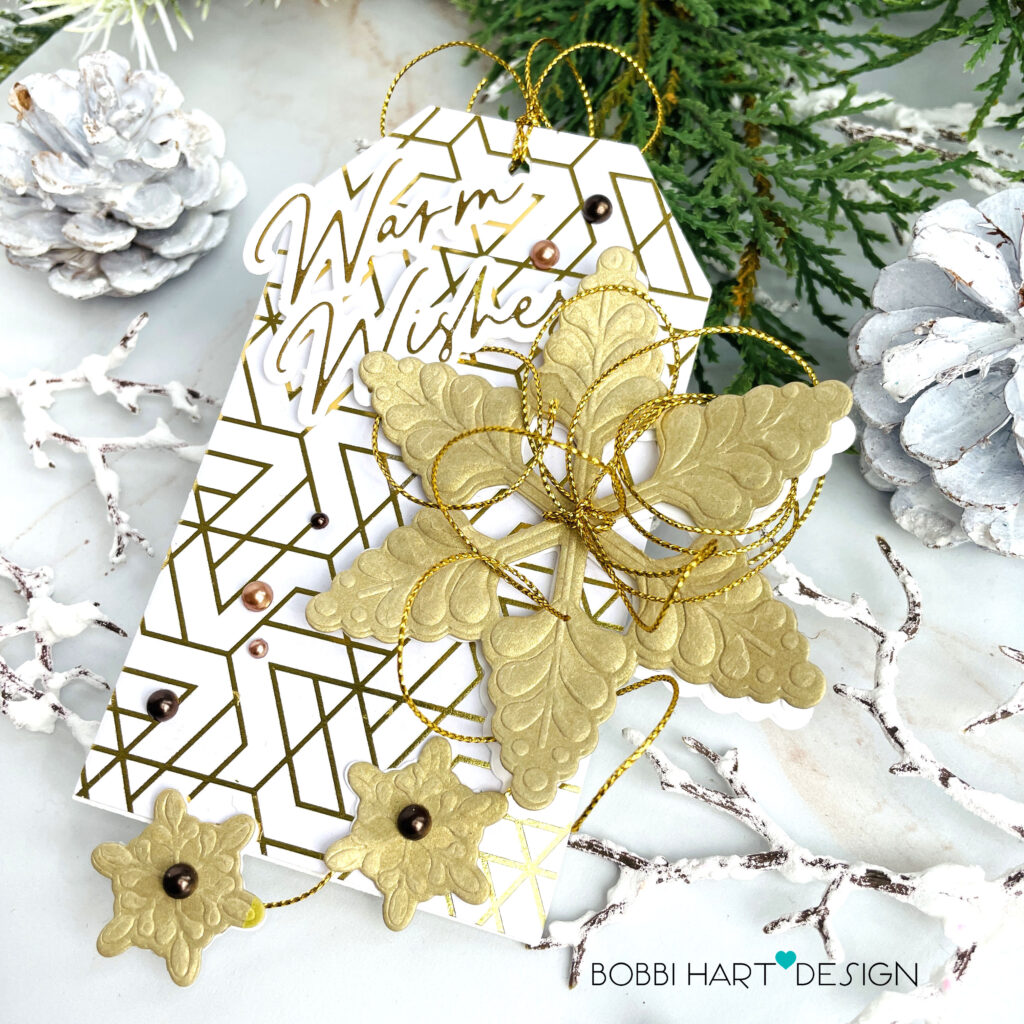
More pearls (Holiday Pearl Stickers and the Autumn Pearl Stickers packages) and a pretty sentiment foiled in gold (like my card, see above for details) using the Honey Bee’s Foil Script: Holiday Hot Foil Plate and Honey Cuts finish off this coordinating tag.
You can shop all these fabulous products from the Holiday Sparkle Collection and beyond at Simon Says Stamp!
Thanks for stopping by today. If you want to see more ideas and inspiration from me, subscribe to my blog, BobbiHartDesign.com. I’ll send you updates on new posts! You can also find me on Instagram as @BobbiHartDesign and on Facebook as BobbiHartDesign.


