

Hi there! There’s a new release in town over at Brass and Bliss Craft Co. is called “Whispers of Fall” and it truly has lots of sweet “whispers” or glimpses of the autumn season. Today, I’m sharing a barn and a pumpkin, both suited for fall! I used the elements of the Fall Farm Scape Die to make not only a barn, but a pumpkin house, too! I’m using the following products for these two cards:
Hello Fall Sign Sayings stamps
Nested Rounded Square With Stitch Die (from a previous release)
Whimsical Pumpkin House

To make this 5″ X 7″ card, I die cut the Large Pumpkin Die from orange cardstock and two of the smaller pumpkin shapes from a bright lime green cardstock. I die cut the trees, windows and front door from the Fall Farm Scape Die from white cardstock. I used black cardstock for the shadow layers of the windows and main door. I blended ink on the trees using Distress Oxide Inks in Rustic Wilderness, Fossilized Amber, Ripe Persimmon and Forest Moss. I used my black 100 Copic marker to color in the tree trunks. I hand cut a green curvy edged cardstock base 5″ wide and about 3″ tall from a darker green cardstock for the pumpkin house to sit on. I also die cut three flowers and some greenery using the Fall Florals Dies. For the greenery at the top of the pumpkin, I die cut a number of green individual leaves to create the shingled roof.
For the background, I cut a 5″ X 7″ panel from 80lb white cardstock and blended Distress Oxide Ink in Tumbled Glass at the top of the panel for sky and Peeled Paint 2/3 down from the top for the landscape ground. I splattered on some water and watercolor paint to make the background splotchy. Later, I added more splotches using my markers to create the look of colorful leaves falling to the ground.
Now for assembly…

I assembled the windows and doors and added them to the pumpkin house. I used a darker orange Copic Marker to add shadowing to the crevices of the pumpkin and around the windows for more dimension. The pumpkin house needed a roof, so I “shingled” it with green fall leaves using the individual leaves in the Fall Florals Die. I attached the green base to the front panel and added the pumpkins, green ones on the side and the large orange one in the middle. I added the trees around it and then the florals in the foreground.
I hand drew in a small walking path to the front door and added more splotches for leaves on the ground to match the tree colors. I stamped two sentiments from the Hello Fall Sign Sayings stamps below the scene and more sprinkles of color using markers around them. A sparkly gem sticker rhinestone was added to the center of the flowers for cuteness. I attached the whimsical scene panel to a white 5″ X 7″ card base to complete it.
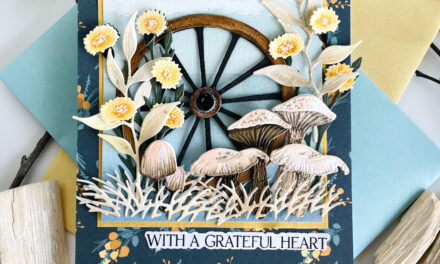
Fall Barn Card

I also made a card featuring the barn. For this card, I used the Moments that Matter stamp set to create the black silhouette in the background on a rounded corner square backdrop die cut using dies from the Nested Rounded Square With Stitch Die. Trees, barn and cornstalks were added to the foreground of the scene. I used a Copic R89 on the red cardstock to add shadows to the right side of the barn and below the overhang. This makes a big difference in making this barn look more realistic and dimensional. I used my white Gelly Roll Pen to add some highlights on the black roof pieces. Dots of color around the front of the barn add a stony/dirt appearance. The sentiment is from the Moments that Matter stamp set.
You can shop the entire collection at Brass and Bliss Craft Co. If you decide to place an order, please use the links in this post so that the Brass and Bliss Craft Co. team knows what inspired you. I appreciate it very much. It helps me to continue to bring more ideas to you!
Thanks for stopping by today. If you want to see more ideas and inspiration from me, subscribe to my blog, BobbiHartDesign.com. I’ll send you updates on new posts! You can also find me on Instagram as @BobbiHartDesign and on Facebook as BobbiHartDesign. Bobbi Hartmann Lemanski, Bobbi Hart♥ Design, Adding h♥art into every design


